
As already described in my guide "What makes a good nature photo", this year I would like to answer more questions that I get asked frequently. Today's is "What's the best way to plan a photography trip or journey?"
I'll try to explain the 10 essential steps - these sound quite trivial in detail, it's actually not rocket science either. Nevertheless, some things can go wrong when applying the individual steps, so I'll try to give some good advices.
Thereby I try to manage the balancing act that basically all 10 steps fit to all genres of nature photography. But first of all I focus on a trip to an unknown area with the primary goal of landscape photography. At the end of the article, I'll go into how animal and plant photography, for example, differs from this in terms of research.
Here are the 10 steps:

In the case of the "implementation", see the steps 9 and 10, I will only describe the planning aspects today. I am aware that in these two steps, of course, the photographic aspects are also crucial for a good picture - many tips on this can be found in my guide mentioned above.
Let`s start now 😉
1 Quo vadis? Find inspiration
A groundbreaking step for me - if the direction at the beginning is already not ideal, then I can do a lot right in the subsequent steps and yet the images do not satisfy me 100% in the aftermath. But where and how can I get inspired? I personally have mainly 4 sources:
1.Books of large nature- or landscape photography competitions
Good photo books are available e.g. from the "European nature photographer of the year", "Montphoto", "Landscape photographer of the year", and many more. These photo books have a few advantages over pictures from other sources: first, most of the pictures in them are damn good, second, they contain information about the creation of the picture, including the location.
2.Blogs of good nature photographers
Many good nature photographers have their own website and describe their current projects in the "BLOG" - often they also go into detail about the journey or the place. I have at least 20 of those blogs in my favorites and browse them regularly. There will be a list of those in my blog soon.
3.Internet forums
I am quite active in the "Natur-Fotografen-Forum" here in Germany, some also in the "DSLR Forum" or on similar boards. Inspiring images are regularly shown there as well, and in many cases locations are mentioned. These forums also offer a good opportunity for networking, with which you can also always get good tips in exchange.
4.Social media
Here I currently use only Instagram, but that's actually enough. Because in contrast to the first three sources, I would describe the world here as a "flood of images". Even if Instagram in my eyes negatively influences photography, especially authentic nature photography (whereby, it is rather some users than the platform...), nevertheless, fascinating pictures are also shown here again and again, sometimes also with location naming.
But what does "inspiring" mean?
This is not about rephotographing motifs or perspectives. It is about finding certain picture elements that exert a fascination on me.
I would like to pick up two examples from this year. At this point many thanks to the nature photographers Holger Dörnhoff and Markus Lenzen, who each provided me with a picture for this section.
Example 1: in late summer I had the opportunity to go on a photo trip over an extended weekend. The focus was to be wildlife photography. I had several subjects/motifs to choose from, finally I wavered between the “Diepholzer Moore/Germany” (bird and moor photography) and the “Vosges/France” (chamois and forest photography). Now I had collected some inspiring images on both topics in the past and took another close look at them. By the way, how I collect them, I will go into more detail later.
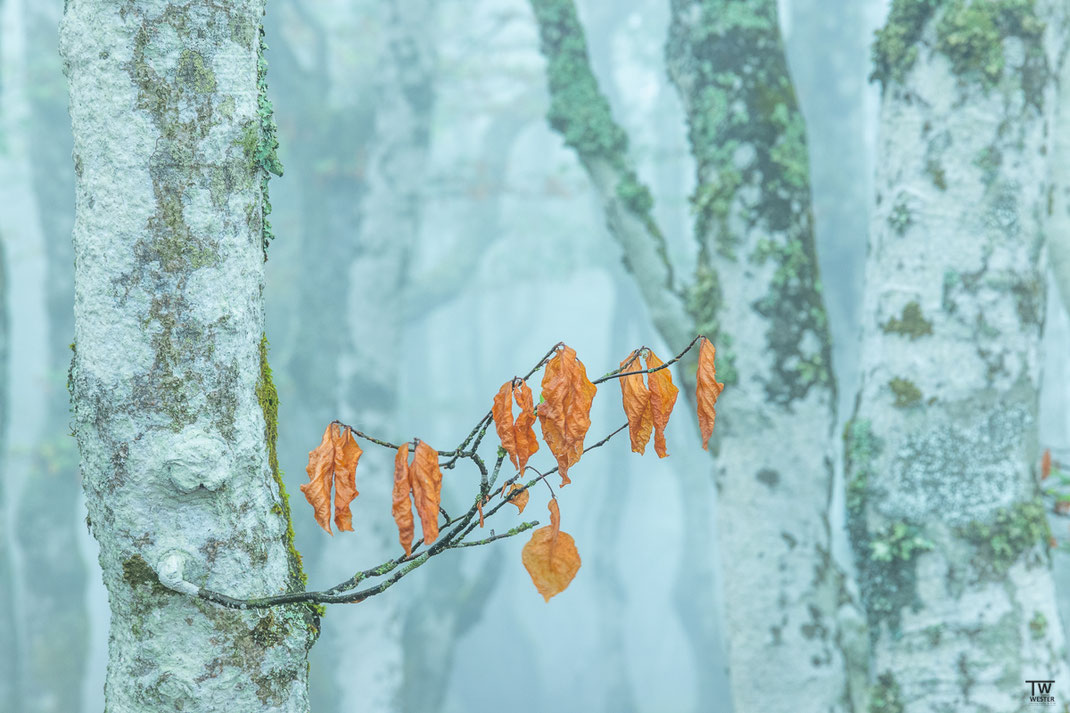
I decided to photograph chamois in the Vosges Mountains. Not because of the chamois. But because of the variety of motifs in the Vosges. The versatility of an area is a strong advantage when the weather changes. I was inspired by pictures showing details of the forests, which I did not know in the form of the forests I know. For example on this wonderful picture of Holger:

The spread of mosses and the number of lichens are already enormous, the original character of the trees as well. Now I had read on Holger website that it was taken in the Vosges.
This "inspired" me to do some more research and if you read through the Wikipedia entry of the Vosges,you quickly realize that the mentioned picture elements, even the fog, are no coincidence: they are simply extremely humid forests.
In fact, it even worked out, despite the short period of time. After I devoted 2 days to the chamois, the conditions on the 3rd day with dense fog were perfect for forest photography. Thereby my Vosges forests series was created. My personal favorite image from this series was this:
...and is a good example: the mentioned picture elements can all be seen here. But the implementation can't be compared at all, they are two completely different pictures and the photo spots were also probably still a few km apart; nevertheless, the plan worked out perfectly.
Example 2: I wanted to photograph a beautiful, large wild garlic forest for a long time. Shortly before the "wild garlic season" I looked again at my stored pictures to it and remembered a few very good scenes of Markus, which he could shoot in the Volcanic Eifel. This beautiful picture is an example of it:
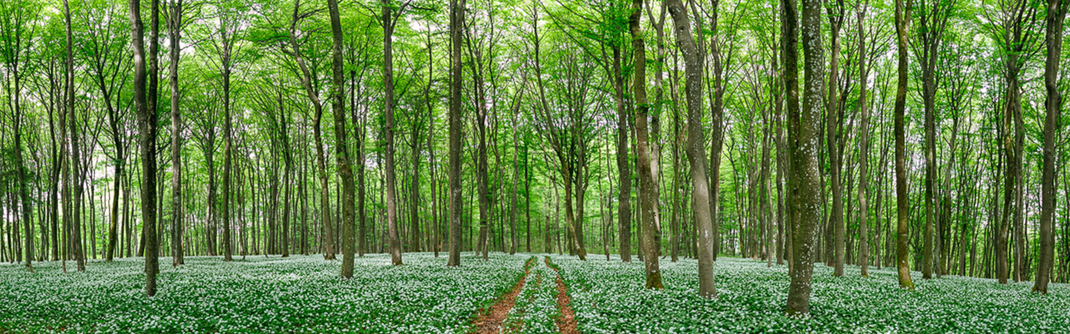
What a wonderful forest! After I had visited other wild garlic forests several times in the previous years, the "Volcanic Eifel" was exactly the right impulse - here I finally found it. And here again: neither the perspectives nor the exact location were "re-photographed", see e.g. my version:

The area on which I had focused photographically was a short hour's walk away from Markus place, so my pictures again look different, see also the complete wild garlic forest series. But going to the Volcanic Eifel actually brought success.
I think the point should be clear now, what was meant by "inspiration". This does not even have to come from good photographers as Holger and Markus - sometimes it is also simple cell phone shots of "hikers" who share the place on social media. Such "picture elements" can also be recognized from those images.
By the way, inspiration refers not only to the location, but also to weather conditions, image styles, etc - but this article is about the spots in particular, so I'll leave it at that description.
But how do I "utilize" such inspiring images now? That's exactly what follows in step 2.
2 Collect and categorize
So now I have found inspiration, but what do I do with it? Very simple, first of all collect them! I do this by taking a screenshot of these images, if available also with text/location. Or I simply take a picture of them. Both of course only for own purposes.
This process doesn't stop either. I continuously collect ideas in this form. Every now and then I go through the folder with the screenshots: I delete similar images, and the rest I distribute to folders. Some folders contain large areas (e.g. "Iceland" or "Algarve"), some rather medium-sized areas (e.g. "Sauerland" or "Berchtesgaden") and others almost concrete photo spots (e.g. "Westruper Heide" or "Geopark Basque Country”).
Depending on what the planning is about - a weekend trip, a day trip or a journey - I now regularly look into the folders that come into question. Below is an example of what that might look like (I had to use some of my own pictures for legal reasons):

As you can see, first it is a simple collection of texts, pictures with headline or signatures, partly also with own notes etc…
3 Make a decision
Now I need a concrete scenario for the “exercise”: for the following steps lets say it is about the planning of a 2-week trip, whose period would have to take place for scheduling reasons in the first half of April. For this I look for a suitable travel destination.
Now I do not go through the folders and consider in each case whether an area is suitable for a 2-week trip. I simply start with which area/country/whatever contains the most interesting highlights, leaving aside all other factors regarding feasibility.
Let's say I come up with the Algarve in the example. Then I check if this place is suitable for the photo trip. The following question is decisive for me: Is it the best time for the intended image elements? In the case of the Algarve, I can already state,
- that April is a super travel month for this destination, in terms of climate and vegetation (June-September and November, for example, I think are not optimal)
- since night photography is not in focus, I don't care about the exact moon position at the time of travel, this would be different e.g. for a March trip to the Lofoten Islands
- since the sea photography is in the focus, the question still arises whether with some motives absolutely low tide must prevail at the preferred photo times and whether this is given with the travel period at all - this can be said only after the exact spot research in step 4/5, I`ll keep this point in my mind for later
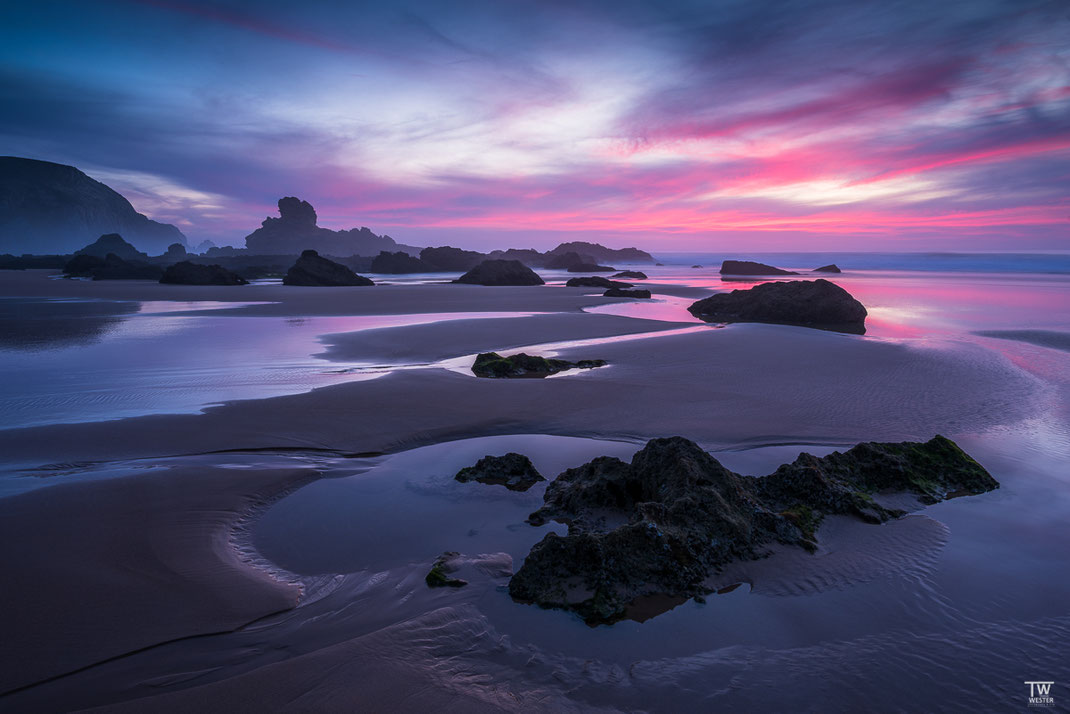
So far, nothing speaks against the Algarve. If that were the case, I would grab the "second-placed" area/folder, etc. - but that doesn't seem necessary up to this point and I'm looking forward to such Seascapes...

4 Google research in 3 steps
The next two steps are a bit of hard work, I can say that already. But with a little practice it goes quite fast. Unfortunately, due to copyrights I have to do this without using pictures/screenshots in these chapters.
The goal of this step is to get to specific spots. Before I use more specific portals (which I will discuss in step 6), there is a very simple Google search in three steps
- I search in German and/or English for spots using obvious search terms, such as "photo spots Algarve", "landscape photography Algarve", "landscape photography Algarve", "photo locations
Algarve" and so on. After the 10th search term at the latest, you will usually find the same spots again and again. In the case of the Algarve this would be about 25 interesting sounding
locations.
- Parallel (in a second explorer) I enter these potentially interesting spots directly in the Google Image Search to get a more detailed impression of the place - due to today's flood of images
you almost always get a result whether the place is worth a visit. In the example this result reduces the spots from 25 to 15
- In the last step I save them in Google Maps in my marked places
5 Map research
- After the last step, I have about 15 markers in Google Maps along the coast of the Algarve.
- Now I look at the two "outer" points which are farthest away from each other. Between these two I draw an imaginary line along the coast.
- On the Algarve, the northernmost point will be Praia de Odeceixe (strictly speaking, this is already slightly outside the Algarve) and the line ends, for example, in the southeast near Albufeira.
- So I zoom in from Paraia de Odeceixe and check all the beaches and bays in turn, heading south, then over the tip at Sagres and finally east to Albufeira. I always look a few (acceptable) kilometers inland and check the national parks, which are usually not many.
- Thereby I see certainly 50-70 potential spots: for this I look again parallel in the Google image search, whether the beaches and bays are interesting. Often you can already tell from the satellite view.
Note: this point is certainly challenging and the more experience you have, the better you can "read" the satellite view. I will probably go for a “deepDive” in a separate blog entry this year.
- Finally, I do the same as in step 4: if a spot appeals to me and I have not already identified it in step 4, I save it in Maps in the marked locations. From experience I find here again a handful of interesting spots, sometimes also spots that do not appear in any "Guide". In our example the list has grown from 15 to 22. Above all, I got to know the area much better, the knowledge I need later.
6 Check for completeness
Before I start thinking about the ideal location of my journey, I should make sure that I have not overlooked any highlight.
For this "check" one can use most different portals and spot databases in the net. I have done this again and again in the last years and I can say that this did not bring a real advantage to me in comparison to the "manual" spot search in steps 4 and 5.
A well known approach is e.g. the spot database on "flickr". Here you can also go through a map like Google Maps, with the advantage that a click on the location directly relevant pictures of users with exact locations. In the end, this is easier and makes things faster. Unfortunately, in my experience, it's a bit patchy and doesn't replace the previous two steps.
Thus, it was rather double work in the end and thus I have saved it since then. But who knows, with growth of the users of these platforms, perhaps the will improve soon.
Last but not least: if I have a "network" of some good nature photographers, it makes sense, of course, to finally talk again with an experienced photographer who has already visited this area, so I did it, for example, in the case of the Vosges mentioned above.
7 Prioritize
For the next step I need a prioritization of the spots, I will explain in step 8 why exactly. For the prioritization (in this example of the meanwhile 22 spots) I put mainly 2 criteria in the foreground:
- Versatility: is the spot only interesting in one direction or in several directions? Is the spot only interesting in certain weather conditions or in several? Does the spot have only one
motif or several? Is the variance of possible perspectives rather high or low? Is the coastline straight or quite winding?
- Particularity: is this my "dream spot" or rather one of many good ones? Are the expected motifs rather well-known or even very rare? Do the motifs correspond to my strengths or my individual photographic style?
Since there are in principle only 2 criteria, one can order these e.g. with the help of a "4-field matrix", which would then look like this:

Some might think that the "special" prio spots in the upper left are preferable to the "versatile" ones in the lower right, but that is not necessarily the case. In my experience, I came back more often with a good yield from spots with a high versatility than from potentially "special" spots.
But that may also be due to the fact that when traveling, you don't have an infinite number of attempts like you do with nearby spots. In the surrounding area of my home, for example, I would prioritize the specialness higher, because I can approach these spots / motifs at very short notice according to the exact weather conditions.
If I now grab the 22 spots and rank them on the scale, the picture looks like this, for example:

Attention! After the prioritization, I know the TOP spots better and can also take up a point from step 3 again: now I have a feeling for whether I absolutely need a certain tide level or a certain sun level that does not exist at all at this time of year - it can therefore actually happen that I still have to drop out at this point of the detailed planning because I determine a certain "exclusion criterion" for my photographic project.
In the example "Algarve in April", however, everything is fine so far and it can go on.
8 Defining the starting point
In principle, after the "final check", I can now define the ideal starting point.. Afterwards I look for a nearby accommodation, mostly at booking.com.
Let's start with the question, how many stops/accommodations should I expect for X spots (here: 22)? Mmh, this is of course an extremely individual decision, which also always has to do with the means of transportation, the travel partner and other personal preferences.
Christina and I have the rule of thumb that you should be able to reach the accommodation from all spots in a maximum of 30-45 minutes. In the Algarve, by the way, this tolerance is a little higher from today's experience, but you can't know that at the initial planning stage.
In our example I determine: we need between one and two accommodations for the 22 spots.
For the ideal location I have an advice: on the following sketch you see an example from northern Spain (we leave the Algarve for a moment). The upper half shows the sea, the lower half the land with a river and a lake. Let's assume I have found and marked 6 spots:

In the first few years, I was pretty quick to book accommodation "in the middle" or where most of the spots were, so around here, at "H":

I have been very annoyed about this several times. Because sometimes it is already clear after day 1-2: actually the spot furthest away from the hotel is by far the best and most versatile 🤨.
In this example we had checked out the spots 2,3 and 4 all on a midday tour and saw that they are beautiful, but at the time of year not necessarily very photogenic.
Some factors can only be determined on site, of course, but especially with regard to versatility, this can usually be found out by a precise Google search, hence the prioritization in the previous step.
In this example, I should have prioritized spots 1 and 6. Then I would also have moved the hotel roughly here, as we did on a second trip:

Back to our Algarve planning: I now take this into account when choosing the location and finally book. Now I'm getting ready for the actual implementation, because there's also a bit of planning needed on site.
9 The initial inspection
So we mentally fast-forward a few weeks or months; it's April and we've landed in Faro, driven a few km and checked in somewhere at the southernmost tip near Sagres.
I have my "marked places" and of course I start with the Prio 1 spots. My tip: do it quietly, either in comfortable lead time to the actual photo session or well outside the good photo times - gladly without camera, during a nice walk, the photo sessions are exhausting enough.
In the Algarve, for example, the sun rises in mid-April at about 7:00 and sets at 20:00. Until 9.30 and from 17.30 I would provide for the photo session, in between there is enough time for relaxation, a good breakfast, and time for such exploratory walks.
But what do I pay attention to? Only on the spot very specific things can be identified:
- Where is a good parking and starting point?
- Where are the most interesting rock structures as foreground element?
- Are there disturbing elements to be considered?
- What focal lengths am I likely to work with?
- What is the tide level when I visit and what will conditions be like at the time of the session?
- What viewpoints and perspectives are possible?
These points take time, and if I don't manage this until the actual session, it's often already too late, resulting in suboptimal perspectives and lower yield.
By the way, if it's not exactly about a trip to the Algarve, but about planning day trips in the surrounding area, there is a special feature here: then there can be some time between the "first inspection" and the final session. Here is a recent example:
At the beginning of December, I discovered this beautiful tree during a "first ascent" of a route and already dealt with possible perspectives. This smartphone shot was taken there:
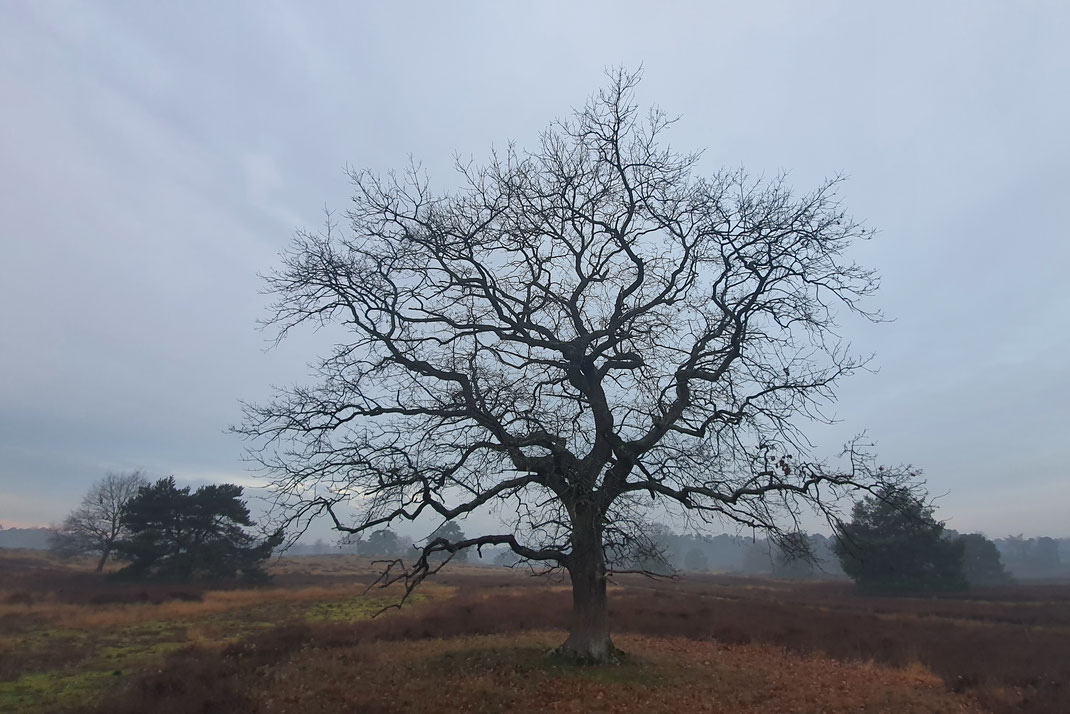
I like the tree very much. The conditions, on the other hand, were really bad. I definitely need dense fog to soften the effect of the darker pines on the right and left and to emphasize the tree, frost or snow would also be quite good.
Unlike on a distant trip, I can visit this motif according to weather conditions.
Back to the Algarve: I try to complete such exploration tours quite quickly in a new area, so that I have a better basis for decision-making for the final photo session.
10 The final photo session
The decision whether to go first to the Prio 1 spots A, B or C, I make short term. This has to do with the weather forecast.
For example, I would rather work with longer focal lengths and reflections when the sky is blue and look for an imposing rocky landscape when the sky is dramatic. So, on short notice, I choose which spot (already explored) to go to depending on weather conditions and tide levels. Thanks to satellite imagery, a forecast about 3 hours in advance is pretty accurate these days.
In fact, it makes sense to plan a little time even before the actual photo session. In April, it would also be enough to be on the beach at 18:30 in Portugal. I would still advise to arrive around 17:30.
Above all to not have to stress, and because in practice one always encounters an incalculable factor. A forgotten filter holder in the car, a small traffic jam on the route or the low tide is stronger than expected and suddenly the planned rocks are no longer surrounded by water and you have to look for other foreground elements.....
And from now on enough is planned. Now it is to go over the beach, give free rein to creativity and enjoy the photo session 😃 Have fun!
I have finally attached again the overview of the chapters and added how long I would need approximately for the individual research steps on the example Algarve and come with my experience for such a trip to just about 4 hours:
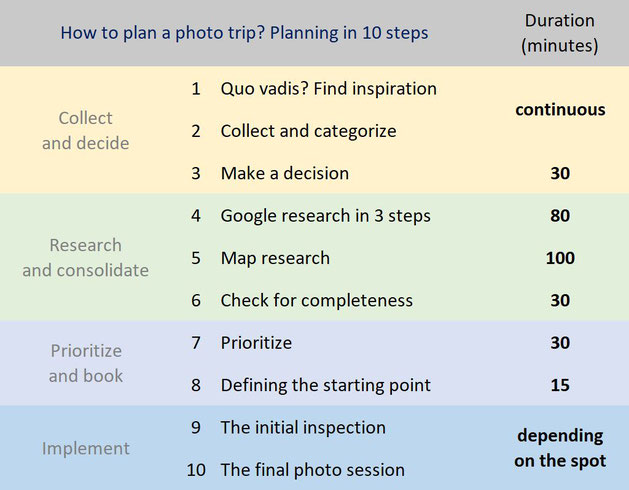
There is only one thing that is not yet included: where exactly do I park, where do I have to go? I usually do this before the individual sessions, on site.
At the end of the article, I would like to briefly discuss the differences in animal and plant photography: Depending on the type of animal or plant, the 10 steps differ little or not at all. For example, if I want to photograph puffins in Iceland, I can proceed in exactly the same way and achieve success.
But of course this does not apply to somewhat rarer or shy and sensitive species, whose locations (for good reason!) are not shared on the web. With respect to the above chapters, the "research", i.e. steps 4-6, will then be somewhat different.
Here, one simply explores potentially eligible areas, sometimes asks local people, observes with binoculars, etc., to get to suitable spots. It is also an advantage if you have built up a personal network of nature photographers and can exchange ideas with them.
I hope this post has now given a little insight into the world of planning a photo session.
Have a nice day!
Best regards,
Thomas
Kommentar schreiben